1-介绍
MistoLine 是一个 SDXL-ControlNet 模型. 可以 适用于:
- 处理多种类型的线条输入
- 输出的质量高: 支持
1024px以上的高分辨率 - 支持多种类型的输入风格: 手绘,预处理器生成,模型生成等等的 线条来源
同时引入了一个新的 Preprossor 算法:
一个新的 Anyline 的预处理算法.
下面的图是使用不同的 PreProssor 的效果
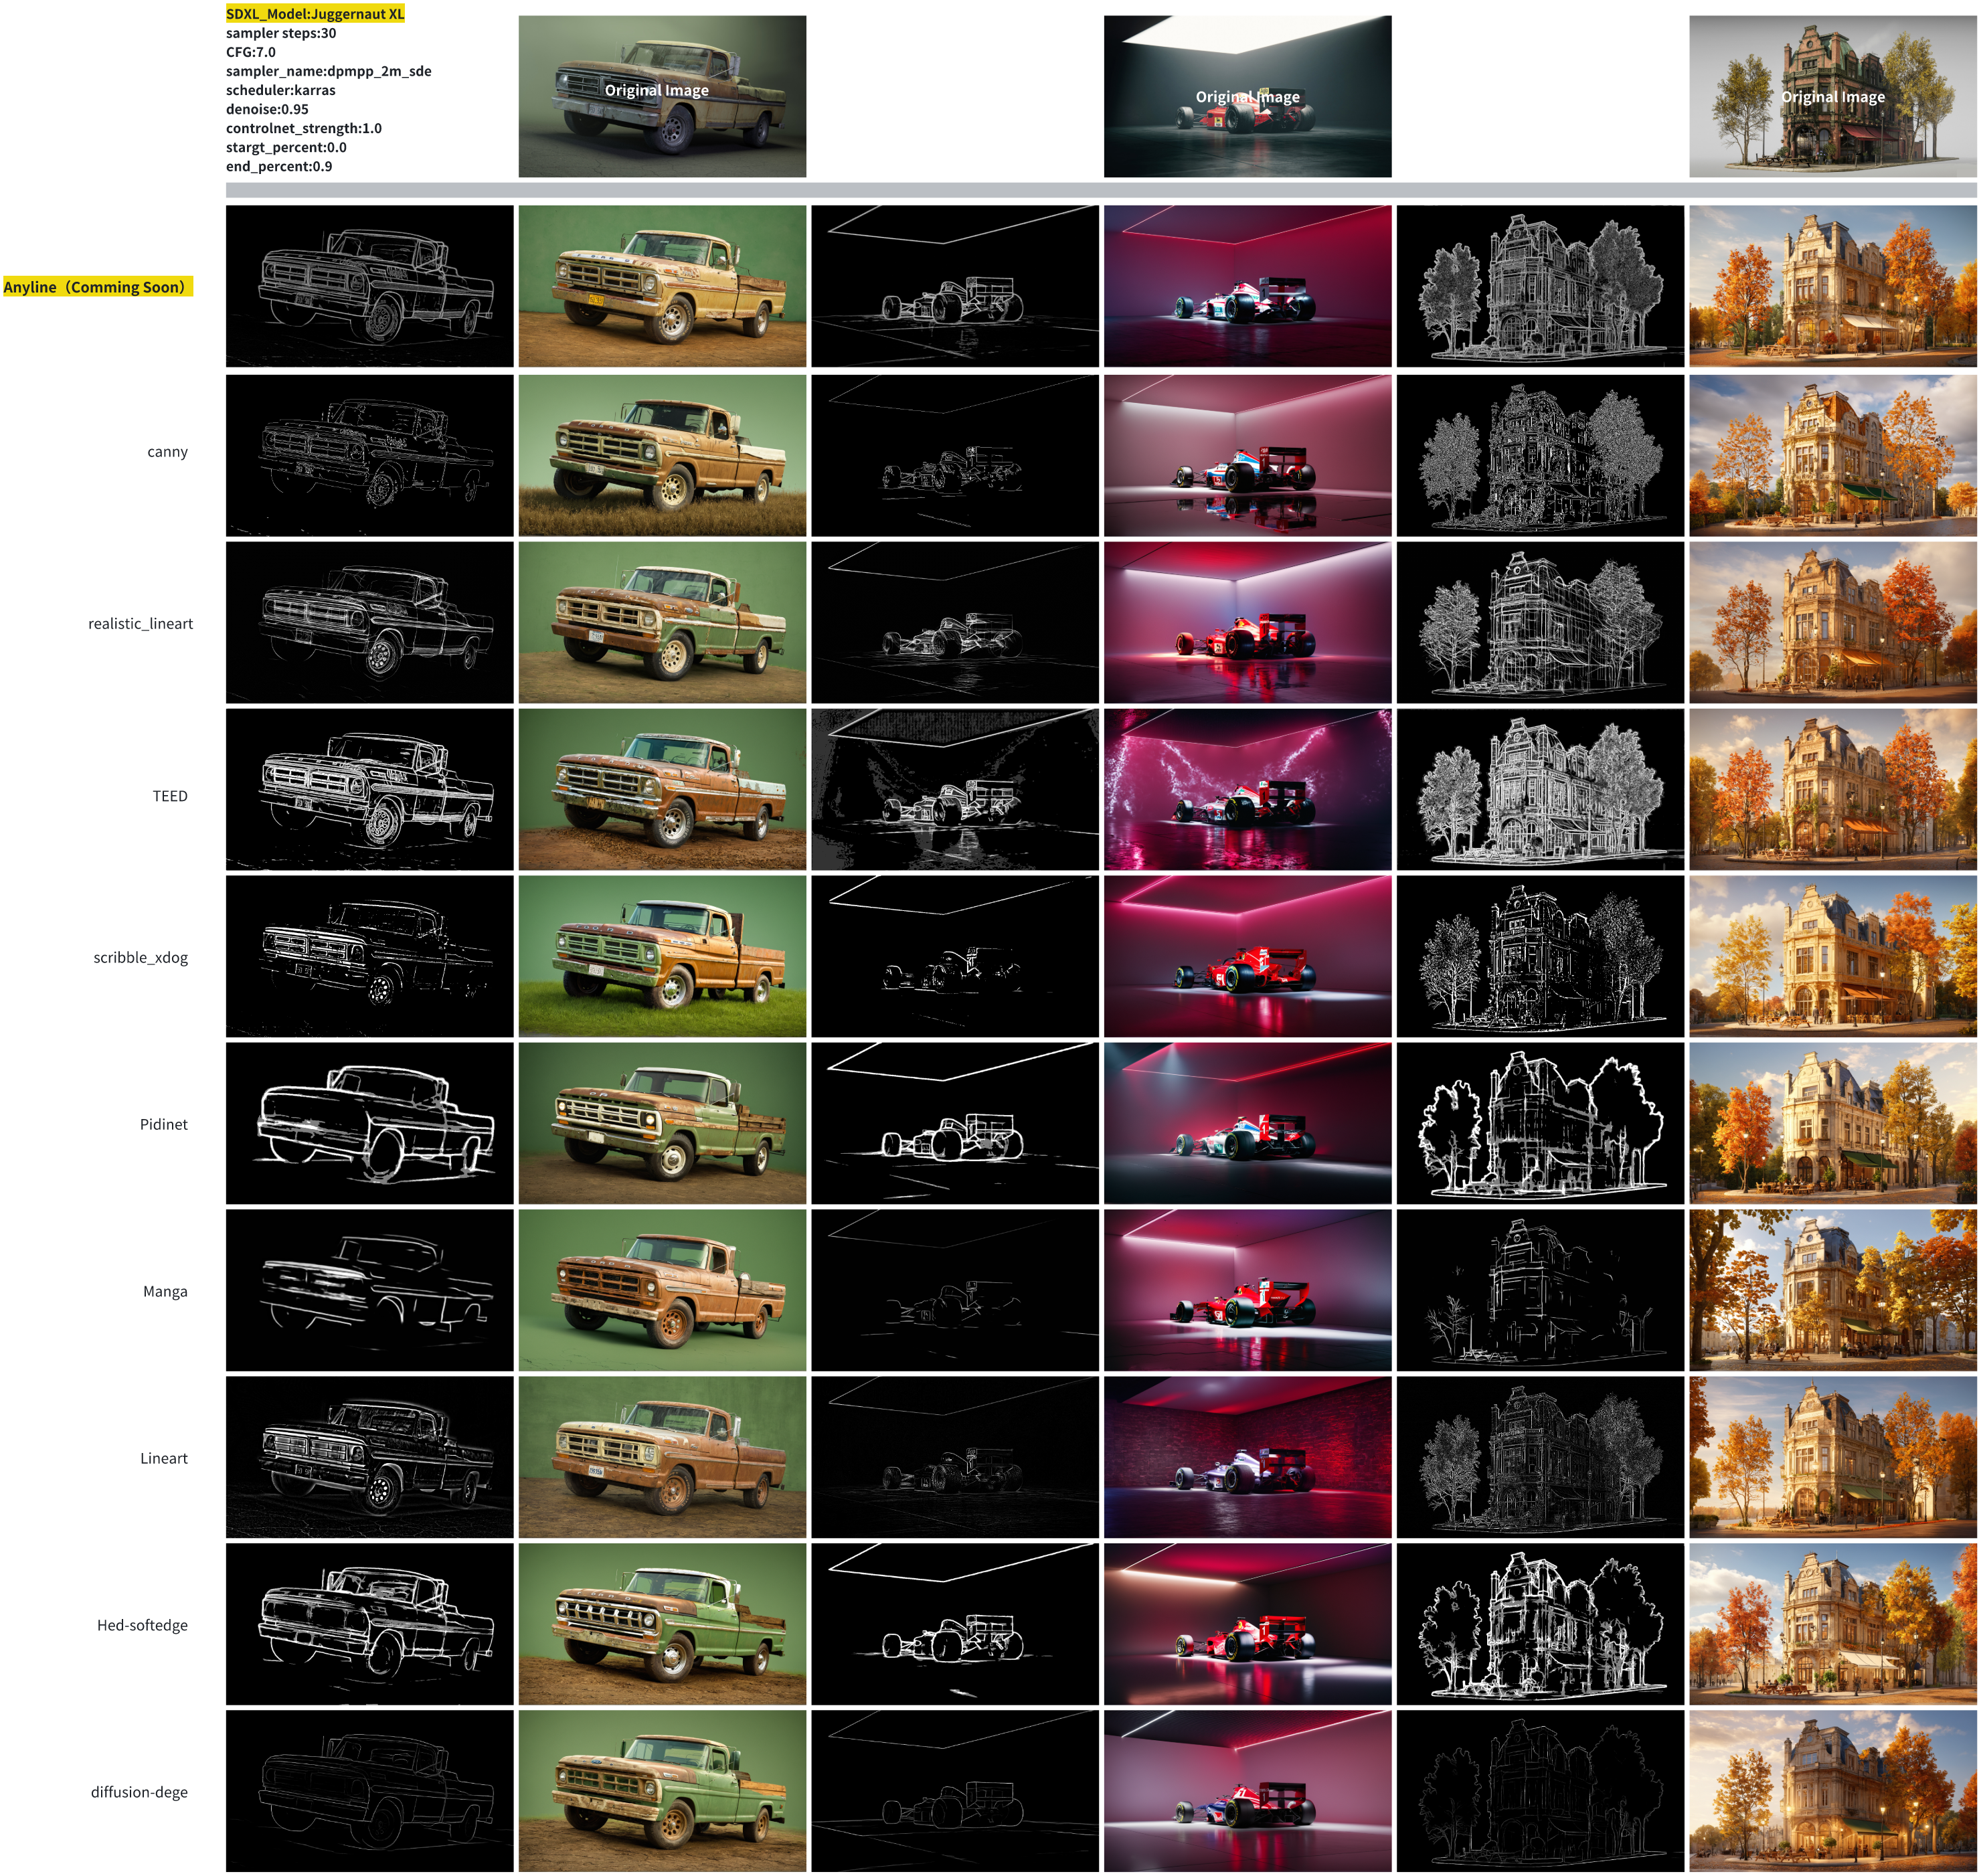
可以看到Anyline 捕获图片线条的能力确实不错.
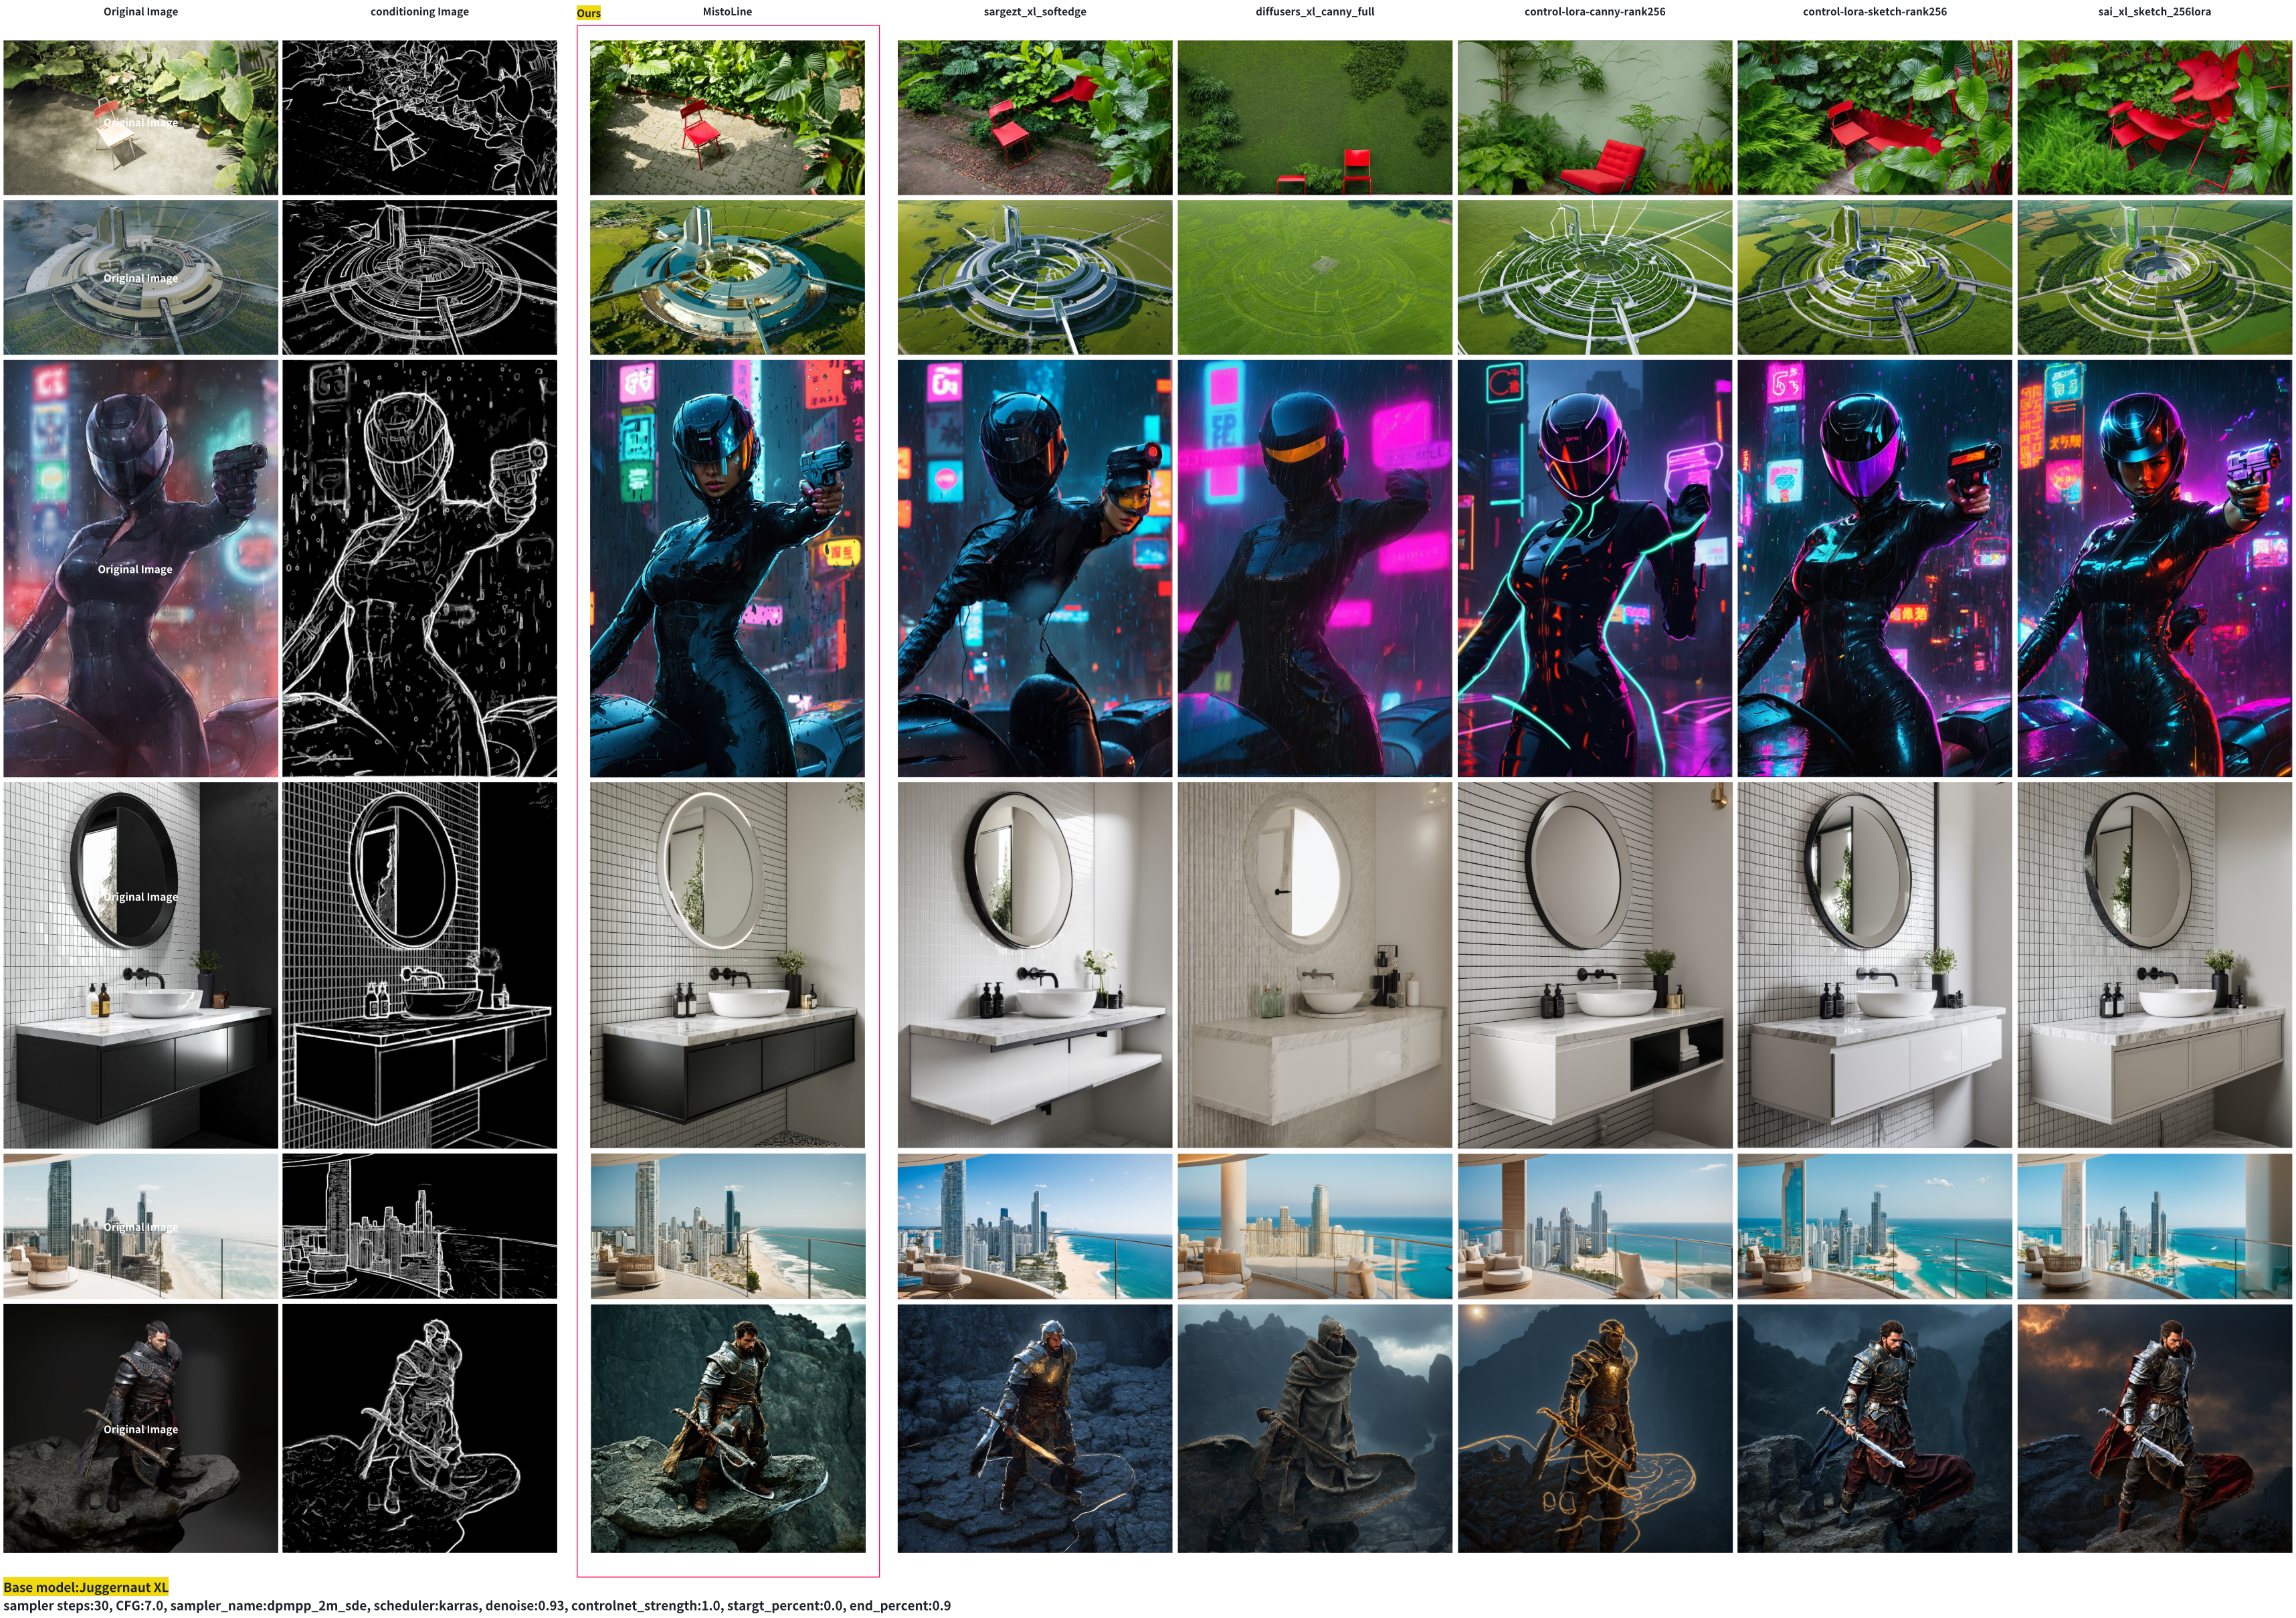
下面是使用不同 controlNet 的效果
ControlNet 在 T2i 中推理的作用.
ControlNet是在原始的扩展模型基础上面 增加了一个新的 可以训练的副本.- 这个副本保持了和原始网络相同的结构
- 这个副本 是专门用来处理额外的条件输入的
输入层:
- 接收文本提示 , TEXT PROMPT
- 接收控制条件, 例如 线条图
处理层:
- ControlNet 副本在这里处理上面的输入条件
- 把生成的结果传递给 扩散模型 UNet
生成层:
- 扩展模型会结合2种信息逐步去噪
更具体点, ControlNet 的设计是 Zero convolution 设计,在 UNet 的每个 block 层级都有对应的控制点.
graph TD
    A[Text Encoder] --> B[CLIP Embeddings]
    C[Control Input] --> D[ControlNet]
    B --> E[Cross Attention in UNet]
    D --> F[Feature Injection]
    E --> G[UNet Denoising]
    F --> G
    G --> H[Final Image]
在 UNet 的每个层级都有对应的控制点. 使用特征的注入方式.
在UNet的不同层级:
- Down Blocks(下采样)
- Mid Block(中间层)
- Up Blocks(上采样)
2-原理
2-1 推理原理简述
1)-输入准备
graph TD
    A[随机噪声 x_t] --> D[UNet]
    B[时间步骤 t] --> D
    C[文本Embedding] --> E[Cross-Attention]
    D --> E
    E --> F[下一层处理]
2)-Cross-Attention 计算过程
# 简化的Cross-Attention实现
def cross_attention(x_noisy, text_embeddings):
    # x_noisy: 形状 [batch, channels, height, width]
    # text_embeddings: 形状 [batch, seq_len, embedding_dim]

    # 1. 将噪声特征转换为query
    query = linear_projection(x_noisy)  # [batch, hw, dim]

    # 2. 文本特征作为key和value
    key = linear_projection(text_embeddings)
    value = linear_projection(text_embeddings)

    # 3. 注意力计算
    attention_weights = softmax(query @ key.transpose(-2, -1))
    attended_features = attention_weights @ value

    return attended_features
3)-简化的 step 处理
def unet_step(x_t, t, text_embeddings):
    # 1. 时间嵌入
    t_emb = get_timestep_embedding(t)

    # 2. 下采样阶段(Encoder)
    h = x_t
    for block in down_blocks:
        h = block(h, t_emb)
        if has_cross_attention:
            h = cross_attention(h, text_embeddings)

    # 3. 中间处理
    h = middle_block(h, t_emb)
    h = cross_attention(h, text_embeddings)

    # 4. 上采样阶段(Decoder)
    for block in up_blocks:
        h = block(h, t_emb)
        if has_cross_attention:
            h = cross_attention(h, text_embeddings)

    return h
4)-ControlNet 的特征注入
def controlnet_feature_injection(unet_features, control_features, scale):
    # 在UNet的每个关键层注入控制特征
    enhanced_features = unet_features + scale * control_features
    return enhanced_features
这就是为什么ControlNet能够在保持文本到图像生成能力的同时,提供额外的精确控制。每个时间步都包含了噪声预测、文本引导和条件控制这三个关键要素。
2-2 训练原理简述
训练的原理是基于 Zero-Conv . 这里简单了解一下这个训练的套路:
graph TD
    A[初始状态: 权重为0] --> B[训练早期: 极小影响]
    B --> C[训练中期: 权重逐渐更新]
    C --> D[训练后期: 形成有效控制]

    E[UNet特征] --> F[特征融合]
    G[控制特征] --> H[Zero Conv] --> F
    F --> I[输出特征]
Zero Conv 的核心作用是:
- 安全起步: ▪ 初始化为0确保不会破坏原始模型行为 ▪ 提供了一个安全的学习起点
- 渐进学习: ▪ 通过反向传播逐步学习权重 ▪ 从0开始逐渐适应到合适的控制强度
- 稳定性保证: ▪ 避免训练初期的剧烈波动 ▪ 确保生成质量的稳定性
这种设计使得 ControlNet 能够在训练过程中:
• 安全地添加新的控制能力
• 保持原始模型的生成质量
• 实现平滑的控制效果过渡
使用:
graph TD
    A[正面提示词嵌入] --> C[ControlNet处理]
    B[负面提示词嵌入] --> C
    D[控制图像] --> C
    C --> E[处理后的提示词嵌入]
    E --> F[SD模型处理]
3-Diffusers Demo
pip install accelerate transformers safetensors opencv-python diffusersfrom diffusers import ControlNetModel, StableDiffusionXLControlNetPipeline, AutoencoderKL
from diffusers.utils import load_image
from PIL import Image
import torch
import numpy as np
import cv2
prompt = "aerial view, a futuristic research complex in a bright foggy jungle, hard lighting"
negative_prompt = 'low quality, bad quality, sketches'
image = load_image("https://huggingface.co/datasets/hf-internal-testing/diffusers-images/resolve/main/sd_controlnet/hf-logo.png")
controlnet_conditioning_scale = 0.5
controlnet = ControlNetModel.from_pretrained(
"TheMistoAI/MistoLine",
torch_dtype=torch.float16,
variant="fp16",
)
vae = AutoencoderKL.from_pretrained("madebyollin/sdxl-vae-fp16-fix", torch_dtype=torch.float16)
pipe = StableDiffusionXLControlNetPipeline.from_pretrained(
"stabilityai/stable-diffusion-xl-base-1.0",
controlnet=controlnet,
vae=vae,
torch_dtype=torch.float16,
)
pipe.enable_model_cpu_offload()
image = np.array(image)
image = cv2.Canny(image, 100, 200)
image = image[:, :, None]
image = np.concatenate([image, image, image], axis=2)
image = Image.fromarray(image)
images = pipe(
prompt, negative_prompt=negative_prompt, image=image, controlnet_conditioning_scale=controlnet_conditioning_scale,
).images
images[0].save(f"hug_lab.png")